Let’s start with the specifications of our file. Create a new document at 300 dpi, 4500 x 3000 pixels in RGB color.
Step 2
Drag the Forest stock pic to the canvas and make it fit to the size of
our file. Hold Shift key while you are transforming to keep the aspect
ratio. Press Enter when you are done and name this layer "floor".
Drag the Jungle stock pic and fit it to the canvas as well. Name this layer "background" and keep it above the "floor" one.
Use the Move Tool (V) to place this layer as follows. Add a New Layer
Mask by pressing the mask icon at the bottom of the Layers Palette.
Use a 0% Hardness Brush (B) on the Layer Mask, black color picked with
the settings below to merge the jungle with the floor. Follow the shapes
of the moss and organic things. You might need to switch to smaller
sizes, for what you can use the "," key.
Make sure that both layers are well blended. Lower the Opacity of
"background" layer to see if you are missing any elements such as the
rock on the left.
Let’s go to use a new blur option available only in Photoshop CS6: The
Field Blur. Go to Filter > Blur > Field Blur. With this very
powerful tool we can recreate artificial depth of field without having
to create several layers with different blurs. Just click in the area
you would like to blur and move the white color inside of the circle to
set the blur amount. Click more or less over the center of the image to
set an overall blur of 19 pixels.
Now the game consists in putting several points all over this layer to
set different blur values, so we can get a rich and believable depth of
field. Each point affects a smaller range as there are more points set
on the layer. When you put more points in an area of the image it gets
collapsed by near blur points so this way it’s easy to have the job
done. Just follow the scheme shown in the screenshots below to achieve
the effect:
And this is how our layer should look at the end. Keep in mind that the
branches at the top left area are closer to the audience’s point of view
than the very background of the image. Lighter areas under the trunks
should remain blurrier than everything else.
Step 3
Select the "floor" layer and go to Filter > Blur > Tilt Shift.
This is also a new feature in Photoshop CS6 that allows us to create
blurs at the edges of an image leaving the center intact (It really
depends how you place and customize it at the end, anyway). Click on the
sharpest area of the layer: This will be the sharpest area of all our
composition so it’s important to make it clear. Set a blur amount of
about 60 pixels and move vertically the white points above and under the
circle to expand the depth of field: We want the first plane of the
image to be as blurred as the first plane blur of the "jungle" layer.
Leave the rest of settings of the filter unchanged.
Step 4
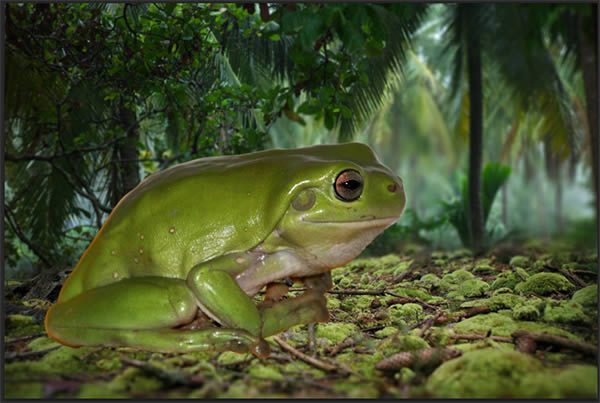
Drag the Frog stock image to the canvas and name this layer "frog". Do not resize it very much – we need it big!
We have to get rid of the background behind our little prince so select
the Pen Tool (P), which is a marvelous tool to mask out elements from
photos. It is not the easiest or the fastest, but it’s the most accurate
tool you can use for this matter. Be sure that the "Path" option is
selected in the Pen Tool options menu at the top left area of the
interface. If you are new to this, the Pen is very intuitive but it
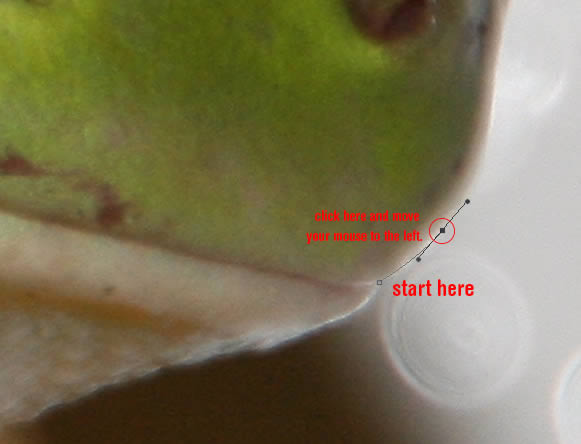
requires some direction: We will be clicking over the borders of the
shape of the frog and moving our mouse to adapt the paths. So click over
any area of the border that you want to set a start point, then click
in a near area and move your mouse (in the example below, a bit to the
left) and you will see that the line between both pointers, which is
called "path", gets adapted to the shape we are looking for.

If you have understood these basics, this will be a piece of cake.
Remember always to move your mouse in the direction you want the path to
be adapted to. Don’t forget to Zoom In (Alt + mouse’s wheel) to get a
more accurate selection.
As you can see, there are plenty of shapes all over the edge of the
frog, so take your time and zoom in as much as you need to get it done.
Be careful with tricky areas such as the double chin: Zoom in to
discover the real intricate shapes to select them accurately; otherwise
you will have to refine your selection later. When you reach your
starting point, just click on it again to close the path.
Right – click and select Create Vector Mask, then go to the layer and
right – click on the mask icon and select Rasterize Layer. Voilá!
Now right – click on the mask icon again and choose Refine Mask to make our selection more accurate.
In the new window menu, check Smart Radius and use the settings depicted
in the screenshot below. This way we will have our borders blended in a
better way: a bit blurred, because no the entire frog is in the
sharpest area of the image, hence further edges of its visual volume
should be blurred according to the depth of field we are using.
Once you are satisfied, press Enter and on the Paths tab in the Layers
Palette, right – click and select Delete Path if you are not going to
use it any longer.
At the end, borders should look more of less like this example:
But now, if you Zoom Out (Alt + mouse’s wheel), you will notice that
there are some areas in between the legs of the frog that need to be cut
out as well. Select the Pen Tool (P) again, and just like we did,
create a path over the areas we want to get rid of. Then right – click,
Make Selection and use a Feather of one pixel because we want these
borders with more blur than other areas of the image, since they are
closer to the first plane of the depth of field. Don’t forget to
Deselect (Ctrl/Command + D) once you are done with each selection.
Step 5
Now that we have the frog masked, press Ctrl/Command + T to Free Transform the layer and rotate it about -22º (to the left).
Move it a bit to the bottom and the left side of the canvas.
So at the end it’s placed this way.

sumber :
tutplus


thanks gan atas tutorialnya,,
ReplyDeletejangan lupa kunjungi balik ya gan :: http://tutorkomputerfree.blogspot.com/
salam blogger :)
blog ane gan : https://jfananda.wordpress.com/
ReplyDeletethanks
thanks gan
ReplyDeletekunjungi balik ya gan : http://ichsanulkamilsudarmi.blogspot.com/